Wednesday 29 July 2015

How to create an email signature in Gmail

1. Go to your Gmail settings by clicking the gear icon in the top right corner of your screen just beneath your picture. Choose “Settings” from the dropdown menu.
Email signature in Gmail
2. On the next page you’ll be on the “General” tab (indicated at the top of your screen). Simply scroll down to the “Signature” section and compose your signature as you would in, say, WordPress. This is rich-text enabled, meaning, you can link, add images, format your text and more.
Gmail email signature box
You can even use a different signature for each email address if you have multiple addresses. Simply choose your desired address from the dropdown, compose your signature for that address and save your changes at the bottom of the screen. Repeat for as many email address as you have.
3. Save your changes by clicking the “Save Changes” button at the bottom of your screen.

How to Create a New Signature in Outlook 2013


00_lead_image_create_signature
If you sign your emails the same way most of the time, you can create signatures in Outlook that you can attach to your emails. Easily create a signature for business emails and a different one for personal emails.
To create a new signature, open Outlook and click the File tab.
01_clicking_the_file_tab
Click Options in the menu list on the left side of the Account Information screen.
02_clicking_options
On the Outlook Options dialog box, click Mail in the list of options on the left side of the dialog box.
03_clicking_mail
On the Mail screen, click Signatures in the Compose messages section.
04_clicking_signatures
Click New under the Select signature to edit box on the Signatures and Stationery dialog box.
05_clicking_new
A dialog box displays asking for a name for this signature. Enter a descriptive name in the edit box and click OK.
06_entering_name_for_signature
You are returned to the Signatures and Stationery dialog box and the name you entered displays in the Select signature to edit box. If it’s the only signature, it will be automatically selected. Enter the text for your signature in the Edit signature box. Select the text and apply font, size, and other character and paragraph formatting as desired. Click OK to accept your changes and close the dialog box.
07_entering_new_signature
Click OK on the Outlook Options dialog box to close it.
08_closing_options_dialog
Now, when you create a new email message, the default signature is added to the body of your email automatically. If you only have one signature set up, that will be the default signature.
09_signature_automatically inserted

Sunday 26 July 2015

FREE SPELLING AND GRAMMAR CHECKER

GINGER FREE SPELLING AND GRAMMAR CHECKER


Ginger Proofreader is a free spelling and grammar checker, intended for both speakers of English as their mother tongue, and English as a second language (ESL). Ginger Proofreader checks and corrects spelling mistakes, misused words, and corrects grammar mistakes, based on the context of the full sentence. Even when a word is spelled correctly, Ginger Proofreader checks grammar to see whether it makes sense in the sentence, and offers alternatives to the word.
Ginger Proofreader can also be used seamlessly by users writing documents, presentations, and emails, in MS-Word, Outlook, PowerPoint, IE, Firefox, and Chrome, enabling them to correct words in the sentence with a single click.
With the award-winning Ginger Proofreader, users can be confident that their emails and documents are using properly structured grammar and are correctly spelled.


Friday 24 July 2015

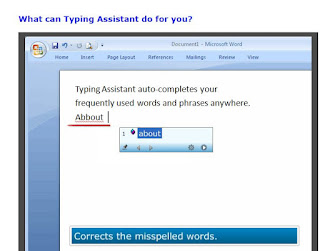
டைப்பிங் அசிஸ்டென்ட் (Typing Assistant)

டைப்பிங் அசிஸ்டென்ட்(Typing Assistant)

இந்த டைப்பிங் அசிஸ்டன்ட்டில் நாம் வார்த்தையின் ஒரு எழுத்தை தட்டச்சு செய்வதற்குள் அதற்குண்டான வார்த்தை ரெடியாக வந்து நிற்கும்.


Typing Assistant is a new generation of word prediction software. It predicts and auto-completes your frequently used words and phrases anywhere. This make typing faster, more intelligent and reduces effort. 


Wednesday 22 July 2015

HD HOLLYWOOD MOVIES FREE TORRENT DOWNLOAD


HD HOLLYWOOD MOVIES FREE TORRENT DOWNLOAD...


Insert Check Mark in Excel

Insert Check Mark in Excel: Easy Spreadsheet Tips


excelExcel gives you a number of symbols you can use to insert images into your spreadsheets. One such image is a check mark. You can use the check mark symbol to place an image in your rows instead of using plain text such as an “X” mark next to a record. Excel has a number of symbols in the list of options, so you can use more than just a check mark to add graphical content to your spreadsheets.
You can use a check mark in any Excel spreadsheet including ones with some type of VBA programming inserted. The image is a static image, so it will not be a part of any dynamic content in the workbook unless you dynamically render the image using VBA.
The first step is to open your Excel file or create a new one on your desktop. You don’t need to install any additional add-ons to use check marks in your spreadsheets. Click the worksheet cell where you want to insert the check mark. Even if you forget, you can still move the check mark later, but it will save you some time to just click the cell.

Using the Symbol Menu Item

Once you open your workbook, make sure you have room for your check mark. The best place to put the image is in its own column, so you can align them evenly down your spreadsheet.
The next step is to click the “Insert” menu item. If you have Office 2010, you have a ribbon. Other versions of Excel have either tabs or a menu item. The below screenshot will help you find the “Insert” ribbon item in Office 2010.
InsertMenu
If you notice in your ribbon, you have a “Symbol” item in the far right side. Click this item and a new window opens. The new window is a list of symbols you can insert into your spreadsheets.
Select “Wingdings” from the drop down font menu list. Scroll down and your choice of check marks is displayed at the bottom of the list.
Symbols
If you scroll through the images, you will find the check mark symbol. Click the check mark in the list of symbols.
Click the “Insert” button to insert the check mark. If you change your mind and you want another check mark, you can also click another symbol and click “Insert.” Excel will overwrite the old check mark. When you are finished, click the “Close” button to complete the process.
Unfortunately, if you want to insert several symbols at once you have to close the window, click a new spreadsheet cell and then open the symbol window again.  However, if you want to copy several check marks down the page, click the cell with the check mark and then highlight the rows or columns where you want to paste the check marks.
Click the “Home” tab. In the “Editing” tab at the far right, click the “Fill” button. If you have another version of Office, click the “Edit” menu item or tab. Click the “Fill Down” option or the direction in which you want to generate the filled check marks. This is a quick and easy way to copy multiple check marks down the spreadsheet.

Using a Quick Shortcut Keyboard Code

If you don’t want to take all of those steps (as few as there are) and instead choose to memorize alt codes, you can use alt codes on your keyboard to insert a check mark. Just like the previous way, there are four check mark options that you can insert using the alt codes.
The following is the list of check mark symbols and their corresponding alt codes:
symbolcheck — > ALT+0251
simbolcheckmark –> ALT+0252
squaredx –> ALT+0253
squaredcheck –> ALT+0253
In case you’re wondering how to work with these codes, you click the Excel field where you want to insert the symbol. Hold down the alt key on your keyboard, and then type the numbers on your keyboard.